Introduction
In the previous tutorials, we have rendered directly to the default framebuffer. In this tutorial, we are going to introduce framebuffer objects, so that we can render to a texture (updating it every frame) and do post-processing effects.
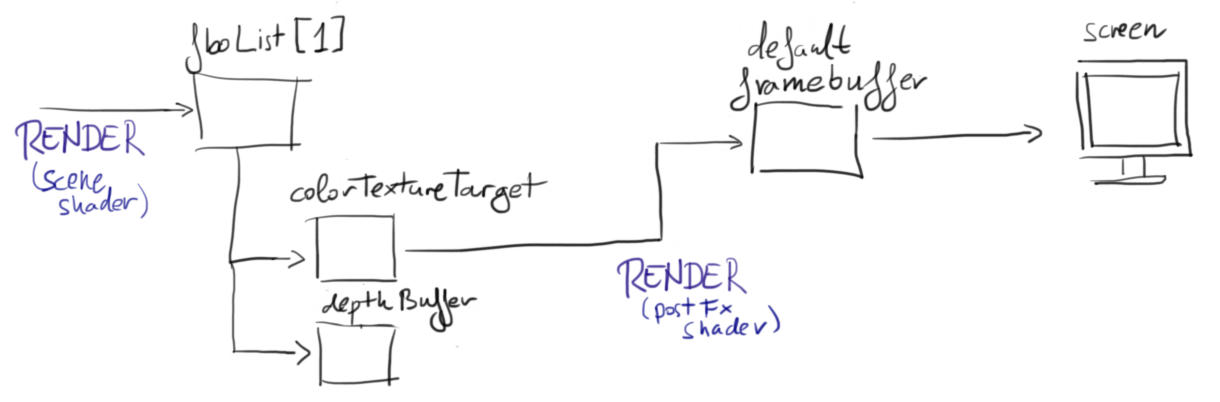
A framebuffer is a "render target", a place OpenGL can draw pixels to. It is not a texture, but instead it contains textures (one or several). The default framebuffer usually contains 2 textures: the color texture, which is copied to the screen every frame, and the depth/sctencil buffer, which is used to do depth culling and other techniques, as we have seen before.
Extra framebuffers can be created manually, containing texture targets and depth buffer that you can access individually and use in other render steps. In this lab, we will create and use several framebuffers, each containing one color texture target and one depth buffer target. A framebuffer could have more than one color texture target, but we won't use that functionality (you can see an example of this in the SSAO project).
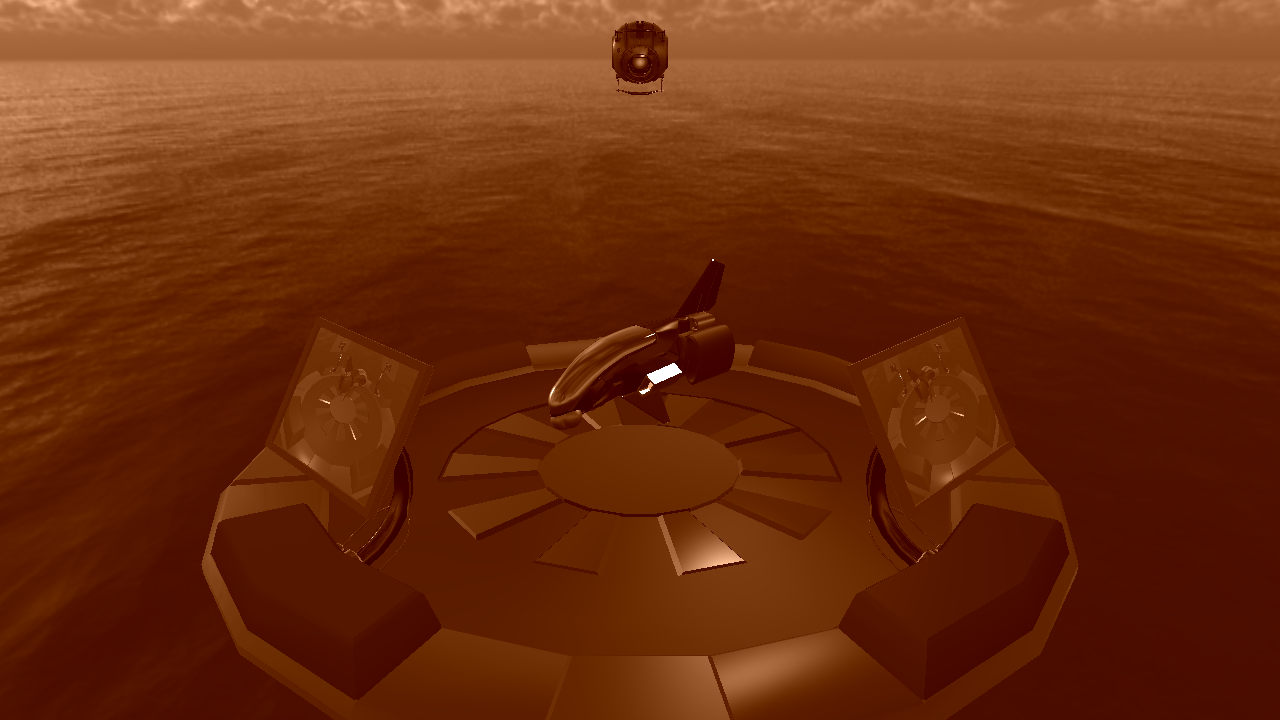
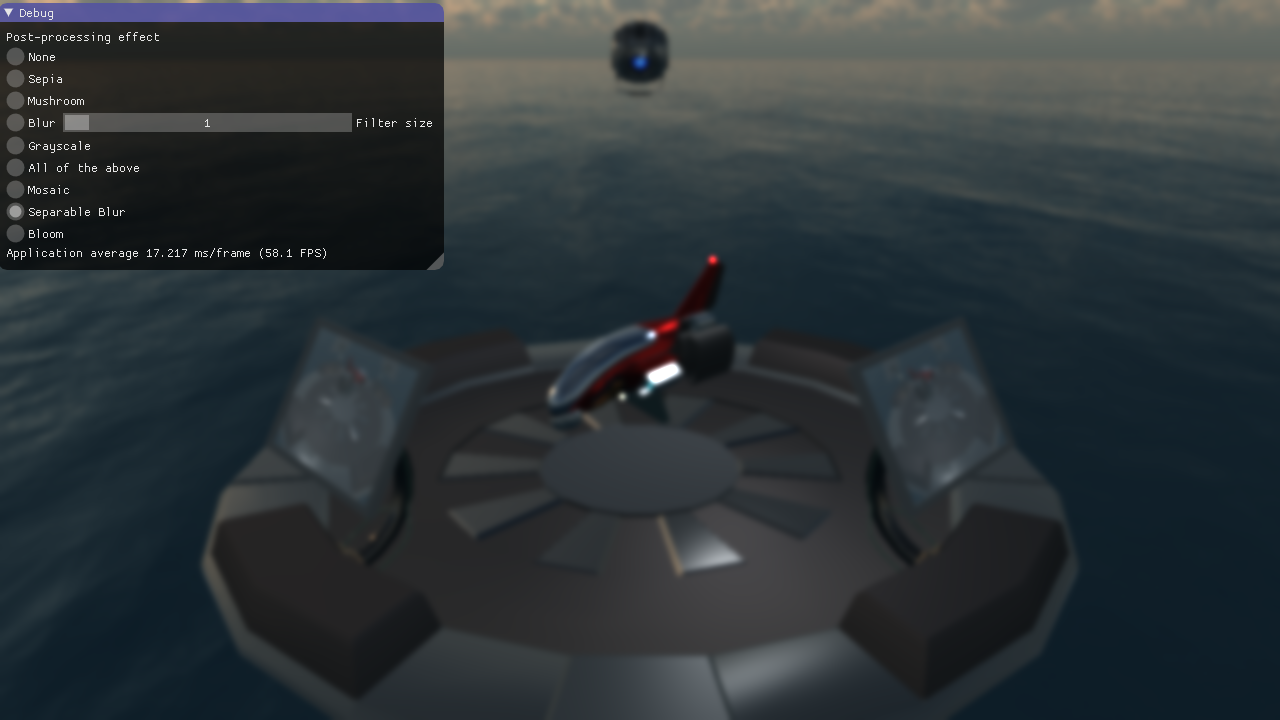
Run the code and observe the fighter on the landing pad. The shading is very dull. Start by copying your implementation of calculateDirectIllumination() and calculateIndirectIllumination() in shading.frag from tutorial 4 to the place-holder implementation in this tutorial (the shader is called shading.frag also in this tutorial). The result should look like below:
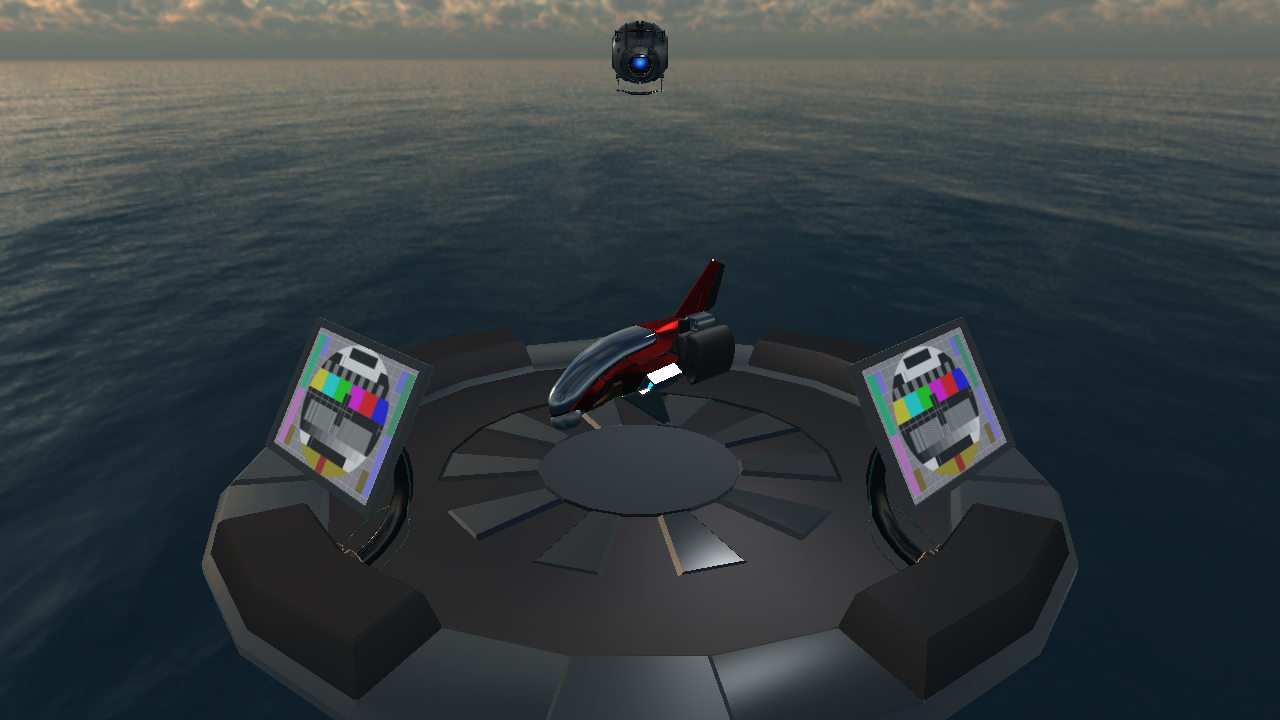
Note the look of the security camera at the top of the image: It has a texture applied to it. Make sure that yours also looks like that. This is why we use the base_color sent to the functions, instead of using only the material_color.
There are monitors beside the landing pad which currently have a static emissive texture showing a tv test image. We will replace this texture with a video feed from the security camera hoovering on the opposite side of the platform. This is done in two steps:
- Render from the security cameras point of view to a framebuffer.
- Use the color texture from the framebuffer as emissive texture.
First we need to make a framebuffer. We have provided a skeleton for making framebuffers in FboInfo, but it is not completed yet. In the constructor, we have generated two textures, one for color and one for depth, but we have not yet bound them together to a framebuffer.
Setting up Framebuffer objects
Similarily to how we create a vertex array object and bind buffers to it (see tutorial 1 and 2), we create a framebuffer and attach textures to it. At task 1, generate a framebuffer and bind it:
// Task 1
glGenFramebuffers(1, &framebufferId);
glBindFramebuffer(GL_FRAMEBUFFER, framebufferId);
Then attach the color texture as color attachment 0 (there may be many color attachments per framebuffer):
// bind the texture as color attachment 0 (to the currently bound framebuffer)
glFramebufferTexture2D(GL_FRAMEBUFFER, GL_COLOR_ATTACHMENT0, GL_TEXTURE_2D, colorTextureTarget, 0);
glDrawBuffer(GL_COLOR_ATTACHMENT0);
And attach the depth texture as the depth attachment (there can only be one per framebuffer):
// bind the texture as depth attachment (to the currently bound framebuffer)
glFramebufferTexture2D(GL_FRAMEBUFFER, GL_DEPTH_ATTACHMENT, GL_TEXTURE_2D, depthBuffer, 0);
Now we have an easy way to create framebuffers. In the end of initGL(), there is a section devoted to creation of framebuffers. We will create five framebuffers and push them to the vector fboList, enough framebuffers for the mandatory and optional assignments in this tutorial.
int w, h;
SDL_GetWindowSize(g_window, &w, &h);
const int numFbos = 5;
for (int i = 0; i < numFbos; i++) {
    fboList.push_back(FboInfo(w, h));
}
We have now intialized framebuffers with the initial size of the window. The window may however be changed by the user, and we therefore reallocate the textures when the resolution changes. This is already performed in the beginning of display(). Have a look at how this is implemented.
Click here to see solution (But try yourself first! You have to understand each step.)
Rendering to the FBO
We will now render from the security cameras point of view, and we do this before we render from the users camera. Let's render to the first framebuffer in our fboList. Bind the framebuffer at // Task 2 with:
// Task 2
FboInfo &securityFB = fboList[0];
glBindFramebuffer(GL_FRAMEBUFFER, securityFB.framebufferId);
And directly after you have bound the framebuffer, set the viewport and clear it:
glViewport(0, 0, securityFB.width, securityFB.height);
glClearColor(0.2, 0.2, 0.8, 1.0);
glClear(GL_COLOR_BUFFER_BIT | GL_DEPTH_BUFFER_BIT);
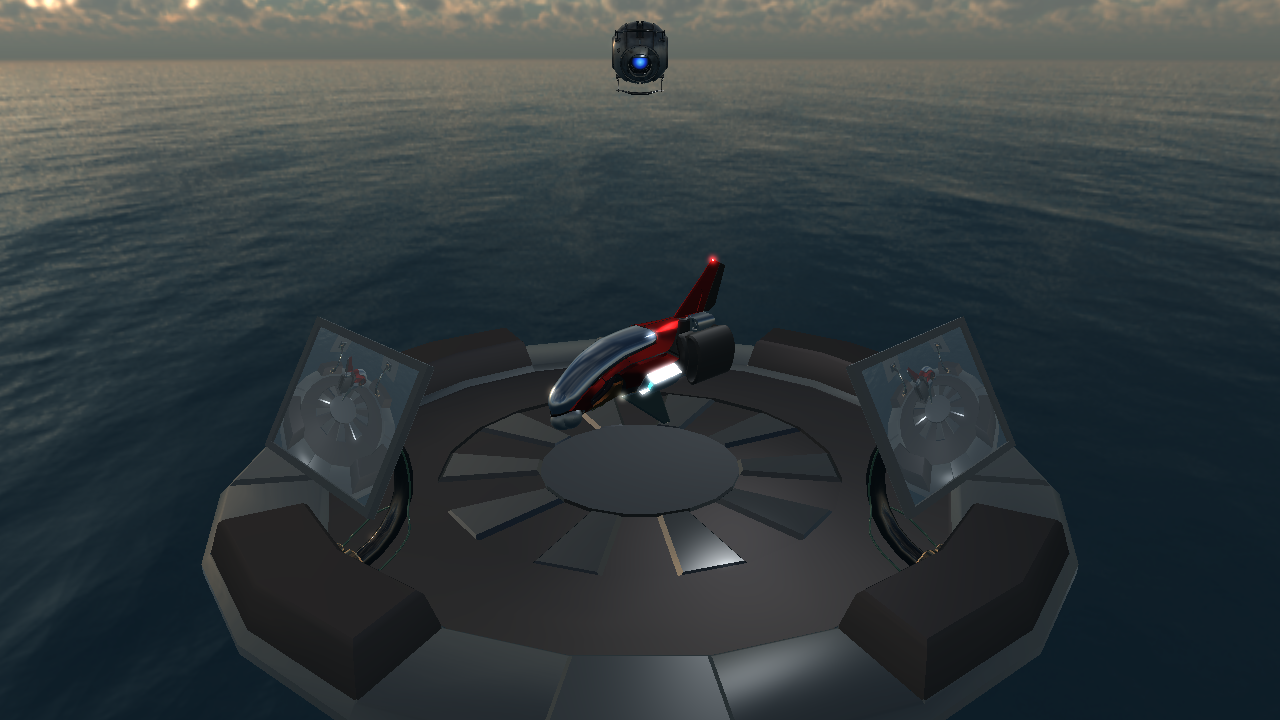
Now, render the scene to this framebuffer, just as we do from the camera, but skip the rendering of the security camera obj-model (since we are rendering from within it). Use the view and projection matrix that already is provided: securityCamViewMatrix and securityCamProjectionMatrix.
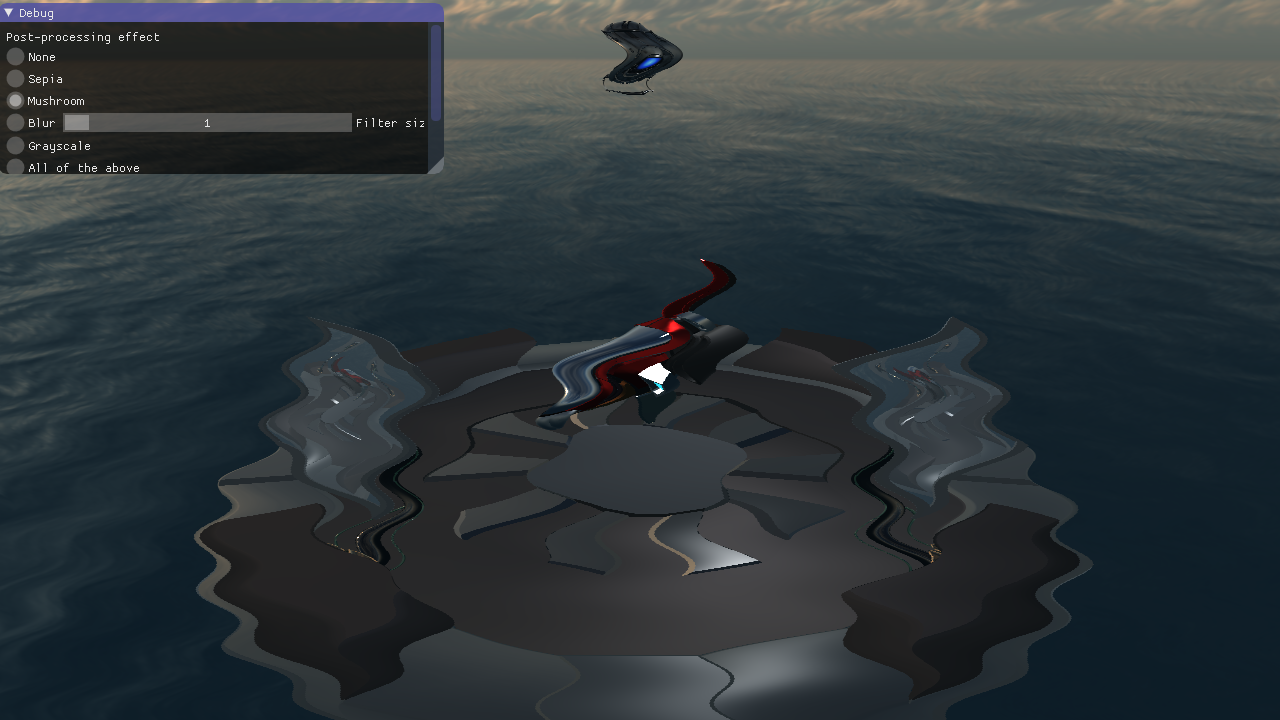
Now we are to use the color attachment as a texture (emissiveMap in shading.frag) when we render the landing pad from the users view below. We will just change the texture id used in the landing pad model.
labhelper::Material &screen = landingpadModel->m_materials[8];
screen.m_emission_texture.gl_id = securityFB.colorTextureTarget;
The result should look like below. You can change the security cameras direction by pressing the right mouse button and moving the mouse. Try it out!
Click here to see solution (But try yourself first! You have to understand each step.)
Rendering the FBO fullscreen
Let's now render scene as seen from the main camera on an FBO too. We will use this for the following tasks.
Start by replacing the default framebuffer with the next available FBO in fboList, and then render normally. If you run the application now you will see a black screen, since nothing has been rendered to the default framebuffer.
To see the scene rendered on the screen again:
- Bind the default framebuffer (i.e. the one that's sent to the screen) and clear it. We have rendered the scene to an intermediate framebuffer, and we want to render things to the screen now. The default framebuffer has "name" 0.
- Set
postFxShaderas the active shader program. - Bind the framebuffer texture to texture unit 0. A framebuffer has a collection of textures attached to it, in the case of the
FboInfoclass we use, each framebuffer has a color and depth textures. The framebuffer (the "container") has "name"framebufferId, while the texture ids can be accessed from thecolorTextureTargetanddepthBuffervariables in the class. - Draw a quad that covers the viewport to start a fragment shader for each pixel on the screen. You can use the already provided function
labhelper::drawFullScreenQuad().
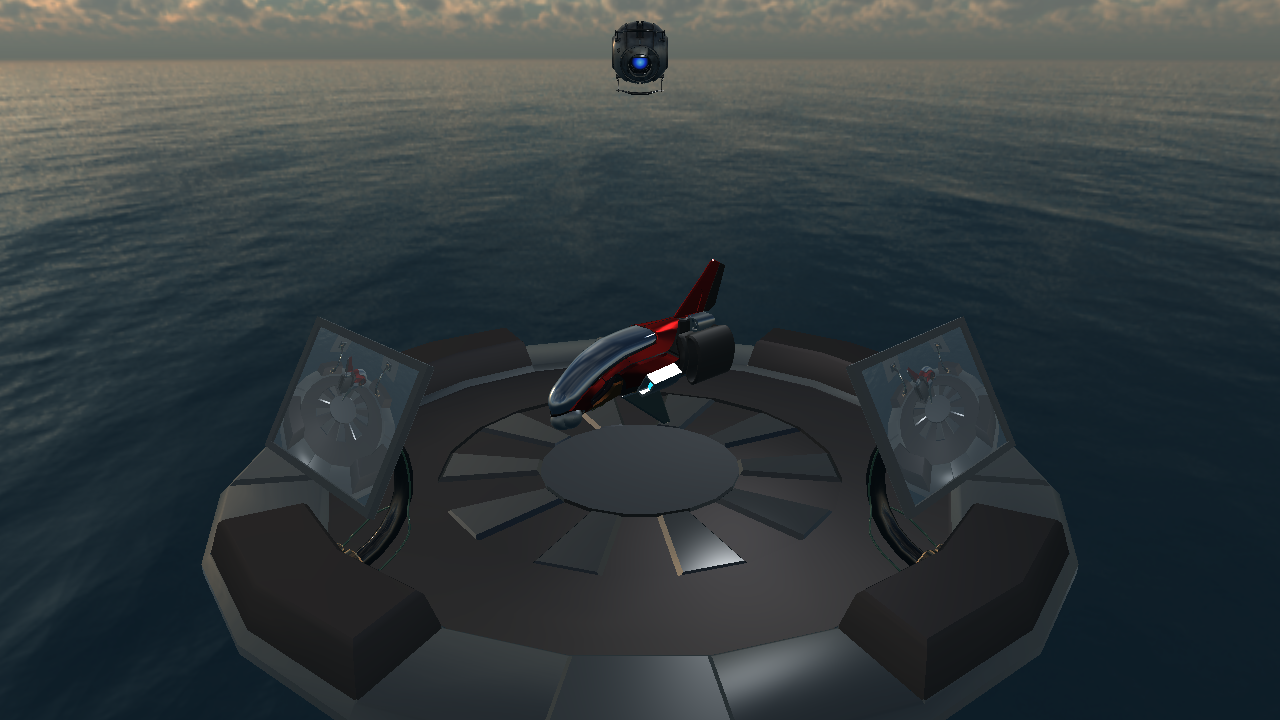
By default, the postFxShader will apply a sepia filter to the image, so that you know something has changed. The sepia filter mimics a toning technique of black-and-white photography, and the result should now look like below.
Click here to see solution (But try yourself first! You have to understand each step.)
Post-processing
Post-processing is, perhaps, the most common use for render-to-texture, with the very likely exception of shadow maps. Most if not all games make use of a post-processing pass to change aspects of the look of the game, creating effects such as motion blur, depth of field, bloom, godrays, simple color changes, magic mushrooms, and more.
Conceptually, post-processing is simple: instead of rendering the scene to the screen, it is rendered to an off-screen render target of the same size. This render target is then used as a texture when rendering a full screen quad, and the fragment shader can be used to change the appearance. Remember that a fragment shader is executed once for each fragment, and for a fullscreen quad this is the same as each pixel on the screen.
There are multiple post-processing effects implemented in the postFxShader, the shader we used in the previous task to draw the framebuffer to the screen. To change the effect used and pass some needed parameters to these effects, we are going to need to set some uniforms for the shader. Add the following code after postFxShader has been set as active and before drawing the fullscreen quad:
labhelper::setUniformSlow(postFxShader, "time", currentTime);
labhelper::setUniformSlow(postFxShader, "currentEffect", currentEffect);
labhelper::setUniformSlow(postFxShader, "filterSize", filterSizes[filterSize - 1]);
The currently used effect can be controlled with the uniform currentEffect, which is set from the GUI. You can toggle gui visibility by pressing G (you can also comment out the if surrounding the call to gui() in main()). For example, changing to the Mushroom post-processing should show an image like below, where the pixels have been resampled at different positions calculated with a sine function:
Inspect the postFx.frag shader again. There are several functions defined that can be used to achieve different effects. Notice that they affect different properties to achieve the effect: the wobbliness is affected by changing the input coordinate, blur samples the input many times, while the two last simply change the color sample value.
Note that we use a helper function to access the texture:
vec4 textureRect(in sampler2D tex, vec2 rectangleCoord)
{
    return texture(tex, rectangleCoord / textureSize(tex, 0));
}
This allows us to sample the texture with pixel coordinates of the glsl built in variable gl_FragCoord as texture coordinates, which supplies the screen space coordinates (within the render target) of the fragment being shaded. Normally, textures are sampled with coordinates in the range [0, 1].
The functions are used from the main function in the shader, try out different ones, and combine them. Notice the effect which is a variation that chains all effects (except grayscale).
vec2 mushrooms(vec2 inCoord);
Perturbs the sampling coordinates of the pixel and returns the new coordinates. These can then be used to sample the frame buffer. The effect uses a sine wave to make us feel woozy. Can you make it worse?
vec3 blur(vec2 coord);
Uses a primitive box filter to blur the image. This method is low quality and expensive; test using a large filter and note the FPS counter in the debug overlay. For real time purposes a separable blur is preferable, which requires several passes. We will explain this process in the (optional) Section Efficient Blur and Bloom below.
vec3 grayscale(vec3 sample);
The grayscale() function simply returns the luminance (perceived brightness) of the input sample color.
vec3 toSepiaTone(vec3 rgbSample);
The toSepiaTone() function converts the color sample to sepia tone (by transformation to the YIQ color space), to make it look somewhat like an old photo.
Experiment with the different effects, for example change the colorization in the sepia tone effect, can you make it red? Also try combining them. Try to understand how each one produces its result.
Click here to see solution (But try yourself first! You have to understand each step.)
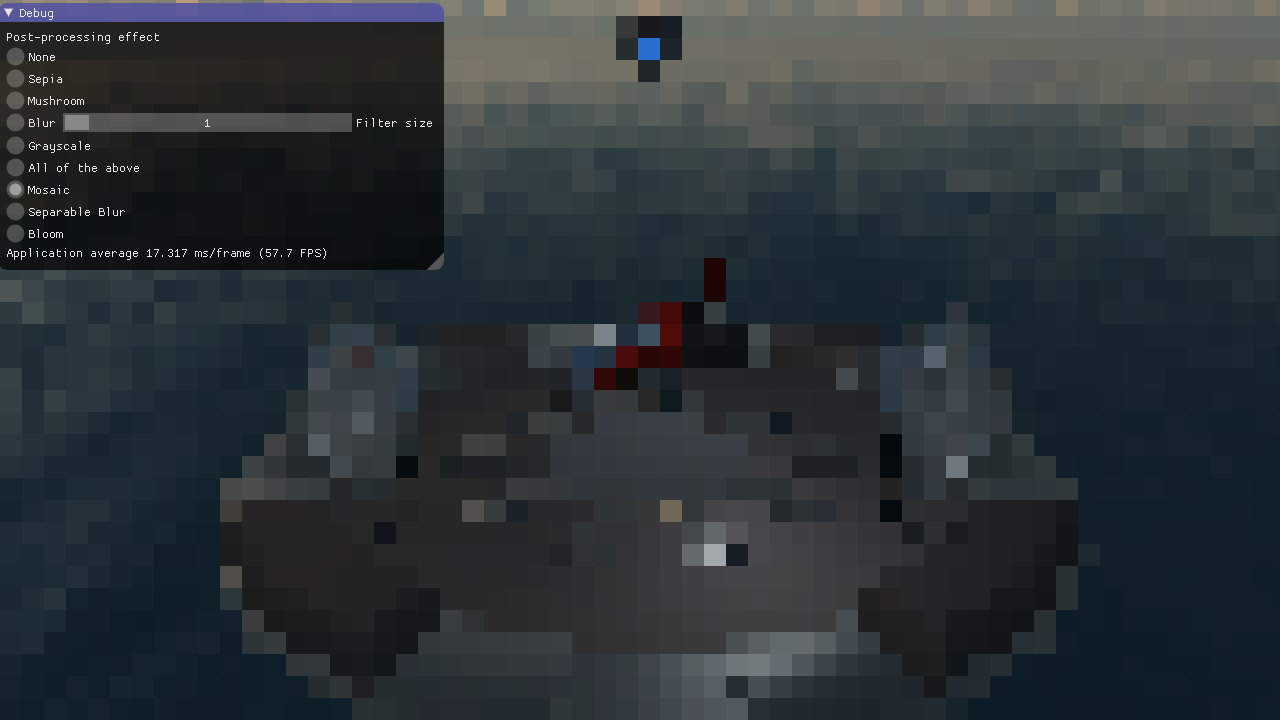
Post-processing - Mosaic
You shall now add another effect. The effect is called Mosaic and the result is shown below. Each square block of pixels shows the color of the same pixel (single sample, no averaging needed), for example the top right or some such. Implement this effect by adding a new function in the fragment shader. Consider the pre-made effects: what part of the data do you need to change?
Conceptually, there are usually two different approaches to solve this problem:
- You can think about it as resampling the image (with nearest neighbors) to a smaller resolution, and then resampling it back to the final resolution (again, nn). For that, you would find what pixel position in the smaller resolution each final pixel corresponds to, and then find what pixel in the original resolution that position corresponds to.
- The other option is to decide that each pixel corresponds to a specific square bucket of pixels that all share the same value (for example, the one at the bottom-left pixel of the bucket) and finding where that value is by seeing how far away from the start of the bucket you are.
Both solutions are mathematically equivalent, and can be implemented in a single, simple, line of code. One solution uses mod(), while the other uses floor() for its calculations.
Click here to see solution (But try yourself first! You have to understand each step.)
Mosaic approaches
Try to explain how these two approaches are equivalent:
Motion Blur
Another typical and dreaded effect usually implemented in games is motion blur. How would you go about implementing it?
More complex effects
In this lab we implement some post-processing effects that take the colors of the rendered scene and use them to produce a modified image.
This is not sufficient, however, for a lot of common screen-space effects used in the real world. What other information do you think you might need to implement something such as screen-space reflections (SSR)?
(In the project after lab 6, you are offered the option to implement screen-space ambient occlusion, which is another effect that, similarly to SSR, uses more information than just the color).
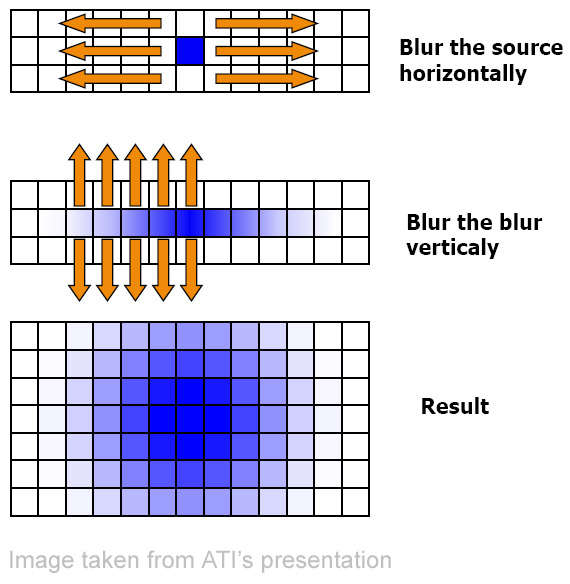
[Optional] Efficient Blur
Heavy blur requires sampling a large area. To implement such large filter kernels efficiently, we can exploit the fact that the Gaussian filter kernel can be decomposed into a vertical and horizontal component, which are then executed as two consecutive passes. The process is illustrated below.
To implement this in our tutorial, we will use two more FBOs: one to store the result of the first, horizontal, blur pass, and then another to receive the final blur after the vertical blur pass. Note that, in practice, we can just ping-pong between buffers, to save storage space. However, this adds confusion, and we want the blur in a separate buffer to create bloom.
We have provided you with shaders implementing the horizontal and vertical filter kernels, see shaders/horizontal_blur.frag and shaders/vertical_blur.frag. Load these together with the vertex shadershaders/postFx.vert, and store the references in variables named horizontalBlurShader and verticalBlurShader.To render the blur, use this algorithm:
- Render a full-screen quad into an fbo (here called
horizontalBlurFbo).- Use the shader horizontalBlurShader.
- Bind the postProcessFbo.colorTextureTarget as input frame texture.
- Render a full-screen quad into an fbo (here called
verticalBlurFbo).- Use the shader verticalBlurShader.
- Bind the horizontalBlurFbo.colorTextureTarget as input frame texture.
Perform this before the post-processing. Now the verticalBlurFbo.colorTextureTarget contains the blurred version of the rendered image. Bind it to texture unit 1, and sample from this unit in the post-processing shader when the separable blur effect is selected. The effect looks as below:
Click here to see solution (But try yourself first! You have to understand each step.)
[Optional] Bloom
Bloom, or glow, makes bright parts of the image bleed onto darker neighboring bits. This creates an effect akin to what our optical system produces when things are really bright. Therefore this can create the impression that parts of the image are far brighter than what can actually be represented on a screen. Cool. But how to do that?
The only thing we really need to add is a cutoff pass, before blurring the image, to remove all the dark portions of the scene. There is a shader for this purpose too: shaders/cutoff.frag. Load the shader, use the fifth created FBO (here called cutoffFbo), and draw a full-screen pass into it. When visualized it should look like this:

Then use the cutoffFbo as input to the blur, which should produce a result, a lot like the image below.
Finally, all we need to do is to add this to the, unblurred, frame buffer (which should still be untouched in postProcessFbo). This can be achieved by simply rendering a full screen quad using additive blending, into this frame buffer. Another way is to bind it to a second texture unit during the post-processing pass, and sample and add in the post-processing shader. In our case, this last should be the easiest option. The screen shot below shows the bloom effect, where the blooming parts are also boosted by a factor of to, to create a somewhat over the top bloom effect.
Click here to see solution (But try yourself first! You have to understand each step.)
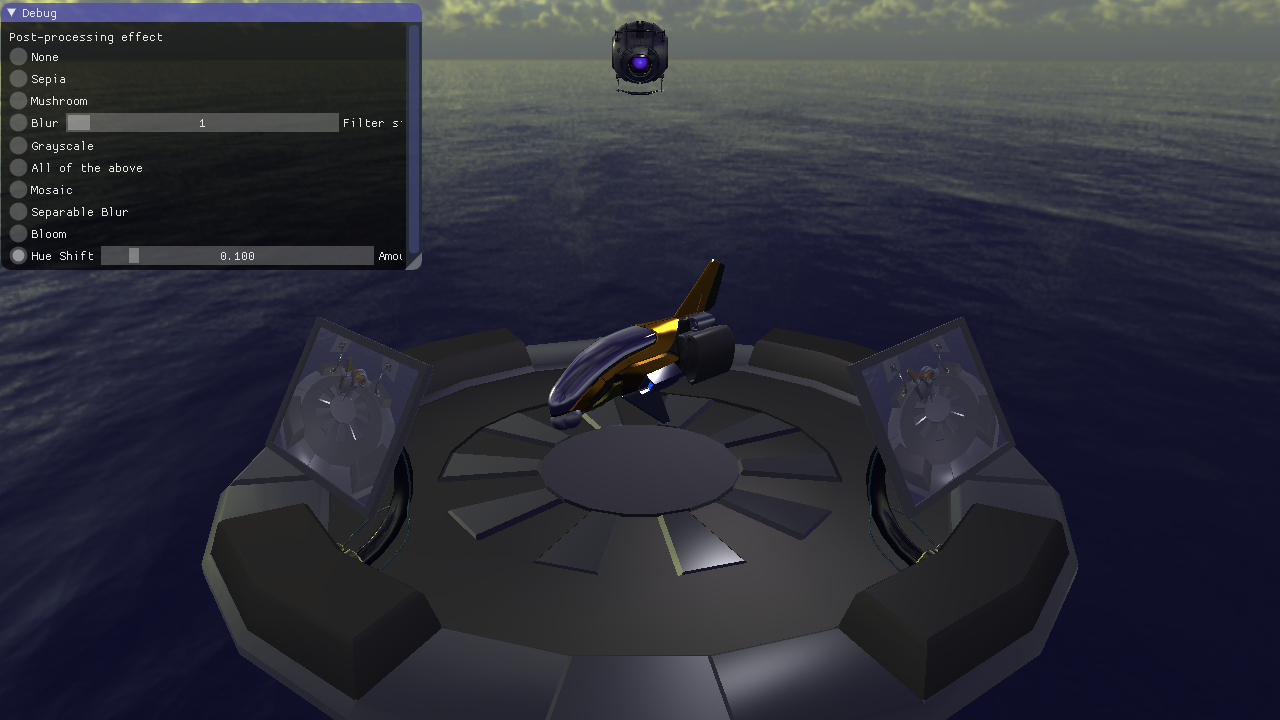
[Optional] Color shift
Changing the colors of the original image can be a very easy thing to do: you only need to swap the RGB components between them to get different colorings, effectively "rotating" the color wheel by 120 degrees, or you could invert them (1-c) to get yet another effect.
But a typical thing one might want is to change the colors in smaller steps than the 120 degrees than swapping the color values. The easiest way to accomplish that is by changing the color space to one where the shift is meaningful, and then switching back to RGB to show the result on screen.
There are different options for the intermediate color space to use, each with different benefits and drawbacks. For example, HSL or HSV color spaces require a few simple operations multiplication, while a color space such as CIE L*a*b* is more perceptually correct, but more difficult to transform to and from.
Let's use HSV for our purpose. In the shader you could define two functions, rgb2hsv and hsv2rgb, receiving and returning a vec3, we can use for this.
In the rgb2hsv we start by calculating the "value" by V = max(R, G, B), and C = V - min(R, G, B). The "saturation" is S = 0 if V == 0, and otherwise S = C / V.
Finally, the "hue" is a piecewise function:
if C == 0 then H = 0
if max(R,G,B) == R then H = fract(((G - B) / C) / 6.0)
if max(R,G,B) == G then H = fract((2 + (B - R) / C) / 6.0)
if max(R,G,B) == B then H = fract((4 + (R - G) / C) / 6.0)
In the hsv2rgb function, start by calculating C = V * S, and X = C * (1 - abs(mod(H * 6, 2) - 1)), and also m = V - C. Then, we find a temporary base color using the following piecewise function:
if H < 1/6.0 then tmp = (C, X, 0)
elif H < 2/6.0 then tmp = (X, C, 0)
elif H < 3/6.0 then tmp = (0, C, X)
elif H < 4/6.0 then tmp = (0, X, C)
elif H < 5/6.0 then tmp = (X, 0, C)
else tmp = (C, 0, X)
Finally, the output color should be (tmp.r + m, tmp.g + m, tmp.g + m).
Once you have these defined, send the input color value through rgb2hsv. You can now modify the x value of the resulting vector, corresponding to the Hue of the color, and use fract() to make this value be between 0 and 1. Finally, send the resulting vector through hsv2rgb to go back to an RGB color value, and you are done!