Introduction and getting help
First of all, you shall have read the Getting Started section, so that you have the tutorial code and can build and run the first tutorial. Most of what we do in this tutorial is covered in the first lecture. If you need more help on OpenGL, have a look at:
- The OpenGL specification (pdf). This is the reference manual for all things OpenGL.
- The OpenGL Reference Pages. Here you can find detailed descriptions of all OpenGL API functions.
- The OpenGL wiki. A community maintained wiki with lots of good information on different concepts.
- A LAB assistant. The friendly people running around the lab rooms.
In this tutorial we will start familiarizing ourselves with OpenGL. To do this, there is a simple OpenGL application that you will study. Look at the source-code (lab1_main.cpp). Make sure you read the comments. At the end of this tutorial you should understand all of this as you will need it for future tutorials.
Learn to debug.
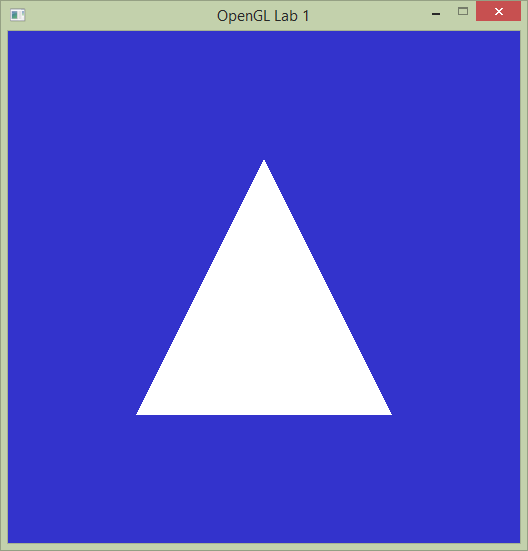 First of all we are going to start the program without debugging (Ctrl+F5) to see what it shows. It should show a white triangle over a blue background, as in the image on the right, but it's showing a black background instead.
Notice that in the output terminal window appears text reporting an OpenGL error. To debug it we will start the program with the debugger attached to it, so let's stop it first now.
Start the program but this time with the debugger attached by pressing F5. As soon as it starts you will be informed that your program has triggered a breakpoint. Press the "break" button and we will use the debugger to find out what went wrong.
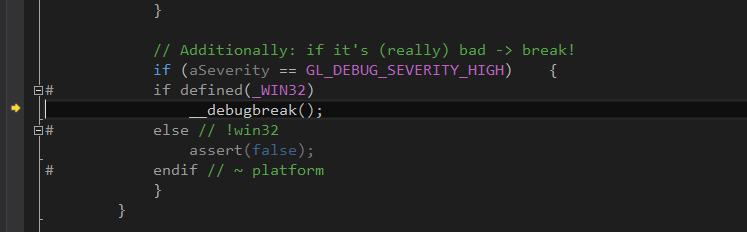
The little yellow arrow tells you at which line the debugger noticed that something was wrong. This time the program broke because an OpenGL error occured. Look at the console window that starts with your application and you will see that you have actually written out that there was an error, before breaking.
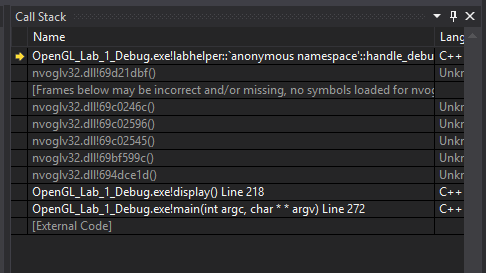 Now find the window called "Call Stack". If you read this list bottom-up, you can see the functions your program has been in before causing the error. Apparently,
 main() called display(), which called some internal driver stuff that eventually lead to a crash. Double click the "display()" line.
This will take you to the OpenGL call that crashed the code. Apparently, some moron has given the wrong input to a function. Stop the program (Shift-F5), fix this bug (you should find the fix in the next line) and run the program again to make sure everything works.
Checking that you found the error and fixed it, choose what function call was the problem:
Interactive UI elements
To get some interactivity in the tutorials we use the library ImGui to create an overlay with UI elements. These elements, e.g. buttons and sliders, can be used
to control various settings and parameters in the coming tutorials. To showcase the basic principles of how it works three sliders have been added to this tutorial.
Use them to control the background color of the window. Enable this overlay by uncommenting the gui() call which is right after the call to display()
in the main loop.
Run the program again. You should now see a new little window where you can change the color of the background. Look at the gui() function and see that you understand how this happens. You can move, resize minimize this window, and your application will remember this for the next time you run the program.
Learn how a triangle is drawn.
The program we will work with currently draws a single white triangle over a blue background. Begin by taking a look at the source code.
Draw calls
The code initializes vertex buffer objects in three steps, as shown in the left column below. In the right column, fill in the correct description of what the function does from the drop-down menu.
Colors
Now, your first task is to change the color of the triangle. If you only change the values in the appropriate vertex buffer object, you’ll notice that nothing happens. The reason is that the vertex- and fragment-shaders are not complete yet. We’ll fix this in the following steps!
Take a look at the simple.vert file. The vertex color is declared as the attribute color in the beginning of this shader, but from then on it is ignored. We’ll need to pass the vertex color value on to the fragment shader so declare a second output from the vertex shader (before main()) like this:
out vec3 outColor;outColor = color;in vec3 outColor;fragmentColor = vec4(1.0, 1.0, 1.0, 1.0);fragmentColor.rgb = outColor;Shader attribute layout
Somehow the data from your colorBuffer vertex buffer object ends up in the `color’ attribute in the vertex shader (simple.vert). Similarly, the positionBuffer vertex buffer object data ends up in the `position’ attribute. The chart below shows how the program links these different parts together.

The table below lists three OpenGL calls. Each call corresponds to a link in the chart. Identify which link by writing the numbers 1-2 in the table:
glVertexAttribPointer() has the following signature:
void glVertexAttribPointer(GLuint index,
                           GLint size,
                           GLenum type,
                           GLboolean normalized,
                           GLsizei stride,
const GLvoid * offset_pointer);normalized, for integer inputs, it either normalizes them so they become values between -1 and 1, or transforms the actual value to float.strideis distance between the end of the attribute for one vertex and the start of the next one. 0 means they are tightly packed.offset_pointerindicates that the attribute for the first vertex begins N bytes from the beginning of the bound buffer. It's represented with a pointer due to backwards compatibility.
Shader linking
More triangles!
Now, your task is to draw a second triangle. This shall be accomplished by creating a new vertex array object in the initGL() function and then draw that object in the display() function. The second triangle must not cover the existing triangle, you are otherwise free to place both triangles as you please.
Next, you shall add a third triangle to the scene. This time, you shall not create a new VAO. Instead, simply add position and color data to the previous VAO. Again, this triangle may not overlap any of the previous triangles.
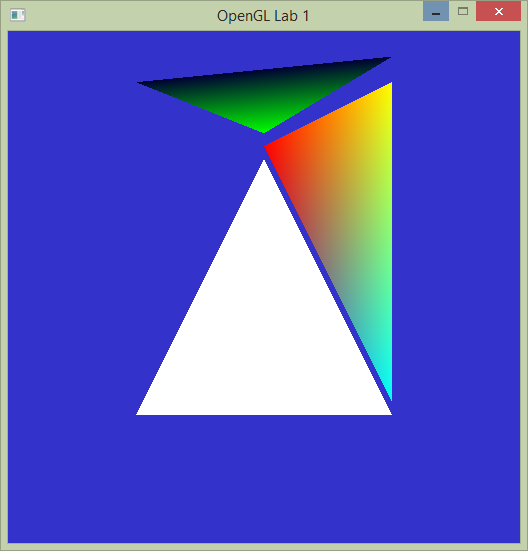
The final solution might look something like the picture below.
Shader execution
How many times are the vertex- and fragment-shader’s main() functions executed when a single frame is rendered? (refer to image above)
Shader initialization
The vertex- and fragment-shaders are linked together into a single program object, which is used (glUseProgram()) to draw the triangle. The chart below illustrates the process. Complete the chart by filling the “Created with:” fields with the name of the OpenGL function that is used to create the objects. Next associate the numbers 1-4 and the letters A-C with the correct OpenGL calls in the table below.

To reiterate; the purpose of this tutorial is to understand how the triangles end up on screen. Working in groups it may be a good idea to interrogate one another, let one explain to the other(s) what each line does, the person listening should make sure that he or she is satisfied that the answer really explains what is going on. And again if the OpenGL specification fails to help, ask an assistant!
When done, show your result to one of the assistants. Have the finished program running and be prepared to explain what you have done.