ModelJUnit tutorial
In this tutorial we create a small model of the fire system, and test a mock implementation of Fire using this model with ModelJUnit.
Modeling
We begin by describing the model, following the method described in [ROS2000].
Domain definition
First we create a list of input to test the features of our SUT.
| Input | Description |
|---|---|
| login | Enter username/password, click “let me in!” |
| logout | Click on the logout link (top right) |
| clickLab | Click on the first lab |
| addFile | Upload one file to the first lab |
| rmFile | Remove one file from the first lab |
| submit | Click the submit button |
| withdraw | Click the withdraw button |
State space
Some input are only available on certain pages. For instance, you can only
login from the login page, or you can only add files on the lab page, etc. This
gives us the operational mode Page = { Login, Home, Lab }
Adding and removing files (as well as submitting) are only possible if the
submission is not yet submitted, so we have the operational mode LabStatus =
{ Open, Submitted }
Finally, to remove a file there need to be at least one file in the system, so
we can add an additional mode NbFiles = { n \in N, n >= 0}. (Note that,
unlike the operational modes in the paper, this one has an infinite number of
possible values).
So every state in my model is a combination of a Page value, a
LabStatus value and a NbFiles value. For instance, Login, Open, 2
or Lab, Submitted, 1.
Transition table
The transition table describes, for each possible state and each input, what is
the resulting state. Invalid combination of State+input are omitted (e.g.
Home, Open, 0 and login).
| State before | Input | State after |
|---|---|---|
Login, Open, $n |
login |
Home, Open, $n |
Login, Submitted, $n |
login |
Home, Submitted, $n |
Home, Open, $n |
logout |
Login, Open, $n |
Home, Submitted, $n |
logout |
Login, Submitted, $n |
Lab, Open, $n |
logout |
Login, Open, $n |
Lab, Submitted, $n |
logout |
Login, Submitted, $n |
Home, Open, $n |
clickLab |
Lab, Open, $n |
Home, Submitted, $n |
clickLab |
Lab, Submitted, $n |
Lab, Open, $n |
addFile |
Lab, Open, $n ← n + 1 |
Lab, Open, $n>0 |
rmFile |
Lab, Open, $n ← n - 1 |
Lab, Open, $n |
submit |
Lab, Submitted, $n |
Lab, Submitted, $n |
withdraw |
Lab, Open, 0 |
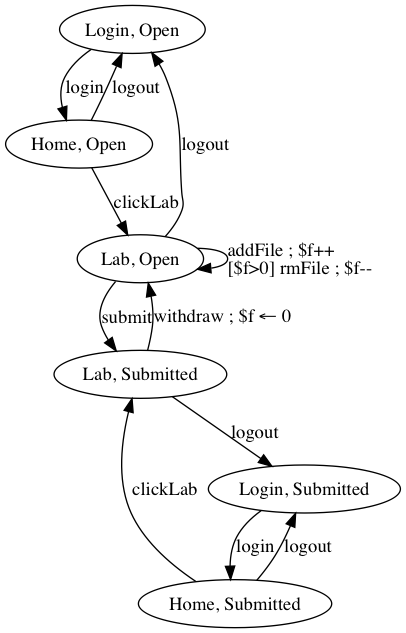
Model diagram
I need to choose which of my operational modes are best represented in the visible states (the bubbles) and which should be internal variables.
One possible way to do that is to represent finite values (i.e. Page and
LabStatus) in the visible states and infinite mode (i.e. NbFiles) as
internal variables, giving the following diagram with the internal variable
$f representing the number of uploaded files, initialized to 0:
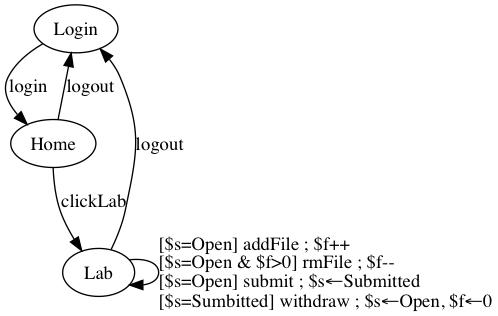
But we can see a lot of redundancy here and maybe we can get a simpler diagram
by treating LabStatus as an internal variable $s initialized to
Open (in addition to the $f variable as before). This creates a smaller
diagram but note that we then need more guards:
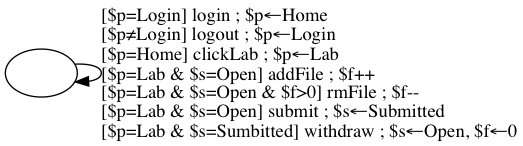
We could push this to the extreme and have only internal variable and a single visible state, but this is silly. Don’t do it!
Testing with ModelJUnit
The example solution can be found on bitbucket.
The model in code
First we implement the FsmModel interface to define our eFSM in ModelJUnit:
For every input in our model, we are going to write a ModelJUnit Action:
@Action
public void myInput() {
  // Here we should update the current state...
}
and a guard that’ll tell ModelJUnit when this action is available. The guard
should be a method with the name <input>Guard and return a boolean,
e.g.:
public boolean myInputGuard() {
  return /* true if the current state allows myInput, false otherwise */
}
The Adapter
Next we implemented the adapter that allows our model to communicate with and take control of our SUT.
For each one of the @Action method in the model, we added a similarly named
method in the adapter class:
class MyAdapter [
  // ...
  public void myInput() {
    // Here we execute myInput on the SUT
  }
  // ...
and, in the model, we make sure that each @Action calls the right adapter
method:
class MyModel implements FsmModel {
 // ...
 @Action
 public void myInput() {
   // ...
   adapter.myInput();
 }
Implementing reset
One of the methods that you need to implement as part of the FsmModel
interface is reset. In this method, your model is supposed to reset itself
as well as reset the SUT to a known state.
Implementing getState
The second method that the FsmModel interface requires you to implement is
getState. This method should return an object, often a string, which
uniquely identify the current state. It should correspond to the Visible
States of your model (the states in the bubbles).
Generating tests
Once you have implemented your model, you can use it to generate tests. In the tutorial example, tests were generated in the main method:
public static void main(String[] argv) {
    MyModel model = new MyModel();
    //Tester tester = new LookaheadTester(model);
    RandomTester tester = new RandomTester(model);
    //Tester tester = new AllRoundTester(model);
    //Tester tester = new GreedyTester(model);
    tester.buildGraph();
    tester.addListener(new VerboseListener());
    tester.addListener(new StopOnFailureListener());
    tester.addCoverageMetric(new TransitionCoverage());
    tester.addCoverageMetric(new StateCoverage());
    tester.addCoverageMetric(new ActionCoverage());
    tester.generate(20);
    tester.printCoverage();
}
First, we need to instantiate your model:
MyModel model = new MyModel();
Then, we choose the test strategy. ModelJUnit offers four different strategies: AllRoundTester, GreedyTester, LookaheadTester and RandomTester:
RandomTester tester = new RandomTester(model);
Next we tell the tester to try and build the graph from the model
implementation. This will basically generate a lot of tests until ModelJUnit
thinks it has seen all the states. It’ll be used later to compute the coverage
metrics. (Hint: if you want the graph building to go faster, you can write your
model so that it is possible to connect the adapter after you have run
buildGraph):
tester.buildGraph();
Then, we tell ModelJUnit to collect some information about the test run:
tester.addListener(new VerboseListener());
tester.addCoverageMetric(new TransitionCoverage());
tester.addCoverageMetric(new StateCoverage());
tester.addCoverageMetric(new ActionCoverage());
Caution
There is a bug in ModelJUnit that prevent you to get correct state coverage
with the AllRoundTester. The coverage you get is only the number of
covered states since the last reset.
To get around this problem, use the following code to get state coverage:
tester.addCoverageMetric(new StateCoverage() {
    @Override
    public String getName() {
        return "Total state coverage";
    }
});
This tells ModelJUnit to stop the test on the first failure:
tester.addListener(new StopOnFailureListener());
Final, we generate a test sequence with a given length and print the collected metrics:
tester.generate(20);
tester.printCoverage();