Set up Git and clone tutorials
In this course we use Git and Bitbucket to distribute the source code for the tutorials. This makes it easy to push updates during the course if needed, and gives us easier access to your code if you need help. As an extra bonus you also get all the benefits of using a version control system, including storing the code online and sharing it within your group. If you don't feel inclined to use Git for version control you basically only need to copy the instructions from this page and treat it as a way of obtaining the source code. We however recommend you to learn the basics of Git since it is a very useful tool when doing the tutorials (and any kind of software development). Below follows a step-by-step guide to obtain the source code from Bitbucket.
- Create a directory in your home directory where you want the tutorial code to reside. Then open a git-bash console there, either by right-clicking the folder and choosing "Git Bash Here", or by starting git bash and cd:ing to that directory.
-
Use git to clone the repository at https://bitbucket.org/sverkerr/tda361.git. This can be done in a number of ways, but the most straight forward way is to just do it from the command line with Git Bash, which accompanies your Git install.
Run the command:
You should now have your own local copy of the tutorials. If you just want to obtain the source code and not use Git for anything else, you can stop at this step. You may however need to update the code later in the course if the tutorials gets updated (as explained below).git clone https://bitbucket.org/sverkerr/TDA361.git - Now create an account on Bitbucket with your Chalmers email. The reason we recommend Bitbucket instead of e.g. Github is that Bitbucket automatically recognizes your student email and will give you a student account, which grants you free private repositories. This is also available on Github if you apply for it, but it can take a number of days to get it recognized.
-
One person in each group create a repository on Bitbucket called e.g. TDA361. It is very important that this repository is private,
since we don't want the solutions to the tutorials all over the internet. Now add this repository as a remote (with name bitbucket) to your local one with the command:
Lastly push your code and make this your default (upstream) remote branch:git remote add bitbucket https://bitbucket.com/your-bitbucket-id/TDA361.gitgit push -u bitbucket master - Invite the other members of the group as collaborators to your repository on Bitbucket. They can now either clone your repository directly or go through the steps above. Note that if they clone your repository, the original one should be added in case of updates. See instructions below.
Updates
If we update the code during the course you will need to sync those changes to your repository. If you cloned from our repository you should already have it added as a remote with the name origin. Merge the changes into your local branch from origin with:
git pull --no-edit origin mastergit remote add upstream https://bitbucket.com/sverkerr/TDA361.gitgit pull --no-edit upstream master:wq followed by
the return key.
First Build
We use CMake to generate the project files for the system of your choice. Below is a quick guide on how to generate the files on the machines in the lab room. You only have to go through this once.
- Start CMake - Press the start button and type 'cmake'. The application 'CMake (cmake-gui)' should show up. Click it!
- Choose directories -
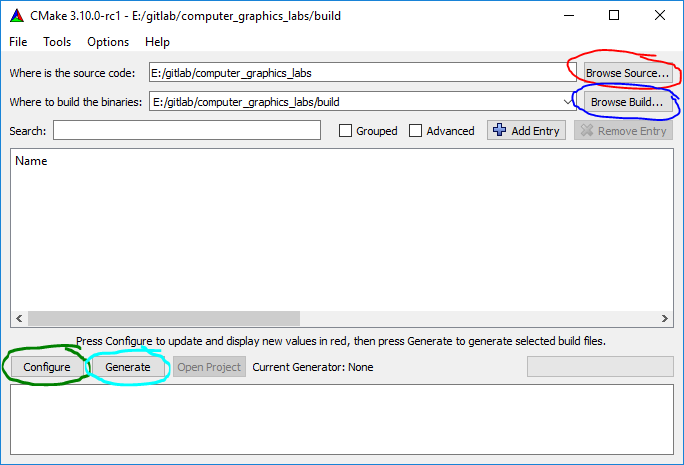 In the dialog that opens, first press 'Browse source...' and find the directory where you cloned the labs into. Then press 'Browse build...' and create a new directory within that directory called 'build'.
- Configure project - Press the 'Configure' button, choose 'Visual Studio 12 2013 Win64' from the dropdown list, and press Finish. Wait for a little while until the configuration is complete.
- Generate project - Now press the 'Generate' button, which will create the Visual Studio solution file for you.
- Open project - You can now open the project either from the 'Open Project' button or by opening the solution file in the 'build' directory you just created.
- Start Lab 1 - Each OpenGL lab is a separate project in this solution. Right click on the Lab1 project and select 'Set as StartUp Project'. Build the project and start debugging by pressing F5.
Save your work!
When you are finished with something (one of the tutorials, for example) or when you want to save the current state of the code to try something extravagant, you should commit your code. In the git bash window, type: git status, and you will see something like this:
On branch master
Your branch is up-to-date with 'origin/master'.
Changes not staged for commit:
  (use "git add ..." to update what will be committed)
  (use "git checkout -- ..." to discard changes in working directory)

        modified:   lab1_main.cpp
                    simple.frag

Untracked files:
  (use "git add ..." to include in what will be committed)

        some_crap_i_added.txt

no changes added to commit (use "git add" and/or "git commit -a")
Modified files are files that are in the version control system (and have been changed). Untracked files are files that are not in the version control system, and won't be saved. If the only important changes you have done are in the Modified files, and you want to save all changes, just write:
git commit -a -m "A message that says what I done..."
If you only want to save, e.g., lab1_main.cpp, but not simple.frag, you can instead type:
git add lab1_main.cpp
git commit -m "Changed something in one file..."
Similarly if you want to add an untracked file to the VCS, just run git add untracked_file.txt
These commands commit files to your local repository only. If you want to get these changes stored to the server (and you have set up a bitbucket repository as described above), type: git push, after you have committed your important changes.
Get your work back when you mess up.
git checkout lab1_main.cpp.
If on the other hand you think you are doing well, but you would like to see what your code looked like yesterday when it worked, you can type git log to get a log of all your commits:
commit 88e2910accd09d3c87a7383e2eeec7a6fab1f1a1
Author: Sverker Rasmuson
Date:   Mon Oct 31 20:41:15 2016 +0100

    Updated links in README.md. Added rsync oneliner to student_proof.sh

commit 76377009059560026d031fcb7cc0d50388db823a
Merge: 1ca1f39 76e13dc
Author: Dan Dolonius
Date:   Mon Oct 31 16:26:46 2016 +0100

    Merge branch 'master' of gitchag.cse.chalmers.se:chag/computer_graphics_labs
Make sure your changes are committed and then find the hash-tag in the log of the commit you would like to look at. Then write:
git checkout 76377009059560026d031fcb7cc0d50388db823a (where the numbers are the hash tag from the log). All of your code will now be exactly in the state of that commit and you can look at the code and run the project. To get back to your last commit again, type: git checkout master.
Other Platforms
OpenGL is supported on many different platforms, but combinations of platforms and harware may support different versions of OpenGL. We support the windows systems in the dedicated lab rooms, if you wish to try on another platform, it will please make sure that it meets the requirements and be prepared to find your own workarounds if it doesn't.