Grading procedure
Deadlines

Introduction to CCHAT
Check how to install Erlang/OTP in your computer!
Building a "real" concurrent system is not easy. In this lab, we aim to put you through some of that experience. You will need to make design decisions, evaluate the trade-off between performance and simplicity, face debugging, and much more. While challenging, it is plenty of fun!
The topic
Nowadays, messaging systems are very popular (Whatsapp, Snapchat, Facebook chat, etc.). They provide great connectivity to users as well as different features like stickers, videos clips, etc. In this lab, you will build a simple (but still quite real) text-based messaging system called CCHAT (the first C is from Chalmers). CCHAT is very much inspired by IRC, an old but still valid standard designed for group discussions. For simplicity, and reasons of time, your implementation of CCHAT is not going to use IRC's protocol nor low-level TCP/IP communication. Instead, it will leverage Erlang's processes and message passing features.
A first look
Below, you can find a short video of how CCHAT will look and work.
Here, some details about the demo.
Command
cchat:server()starts a chat server calledshire. For the rest of the lab, users connect to that server.Command
cchat:client()opens a new client window. The GUI is basic, but the good news is that you do not have to implement it yourselves.The user interface has a
Systemtab. This tab has the purpose of showing the activities carried out by different domains as well as reporting errors. For instance, when connecting to theshire, you saw the following on the system tab:* Trying to connect to shire... + Connected!
The chat server cannot have two users connected using the same name. By default, the GUI utilizes the nickname
user01. The command/nick <username>changes the nickname to<username>. The format forusernameis the same as for an Erlang's atom, i.e., it will start with a lower case letter and followed by letters, numbers, or underscore (_). For this lab, you only need to handle changing the client's nickname when disconnected from the server.In order to chat,
bilbojoined to the discussion group (or channel)#hobbitswith the command/join #hobbits. By convention, all the channels' names start with#.Then,
frodojoined to the same channel. After a small, chatfrodoleft the channel using the command/leave. Then, he disconnected from the server by issuing the command/disconnect. Similarly,bilboexecuted the same commands and finally closed the application.
Architecture
CCHAT will use a client-server architecture. It consists on a client part, which runs the GUI and a client process, and a server which runs the chat service (server process) and host the discussions groups. The graphic below illustrates the situation.
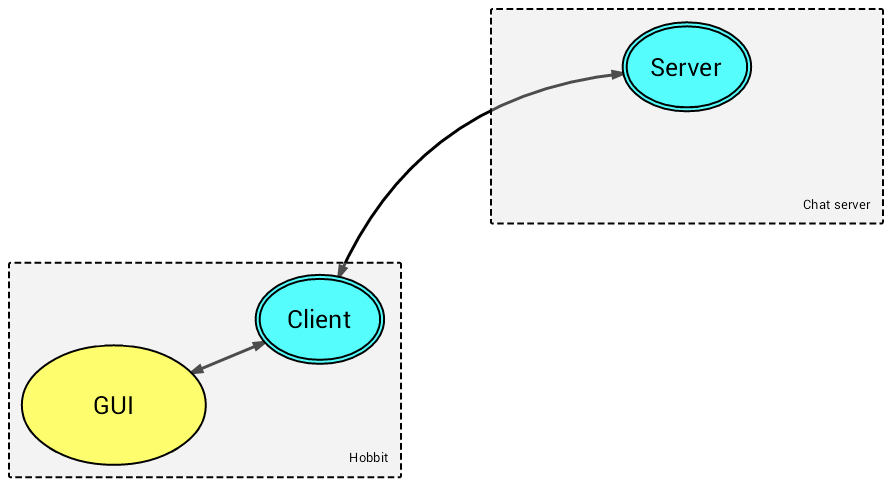
In the graphic above, the client process (blue circle with double lines) has the goal to be a bridge between the GUI and the server process (the other blue circle with double lines).
Location of the client and server processes
The picture suggests that the client and server processes might be located in different machines. Nevertheless, and for simplicity, we will consider that all the processes are located on the same local machine. If you get the implementation of CCHAT right, you will be able to easily adapted to run in a distributed environment. This is one of the great aspects of Erlang!
The GUI and the client process
The GUI will interact with the client process through a specific protocol (described below). You do not need to implement the GUI, we will give it to you. Instead, you need to provide a implementation of the client process. Your implementation should know how to interact with the GUI, i.e., it should follow the GUI protocol (to be explained later on).
The server process
The server handles the requests coming from the clients. The protocol being used between a client and the server is up to you. Take into account that the chat server might be composed by several processes, not only the one that you see in the picture above. You have to think of the parts of your code where having more processes would increase the concurrency of your application. Remember to keep your code simple.
The GUI and the client process
The protocol
The protocol between the GUI and the client process is partly fixed. The reason for that is two fold. Firstly, by following the protocol, you will be able to use the GUI without knowing its internal implementation details. Secondly, and more importantly, we will test your code assuming that your client process follow the protocol. If you do not follow it, your code will not pass the tests (see the test section below) and your submission will be immediately rejected.
The protocol scheme is as follows.
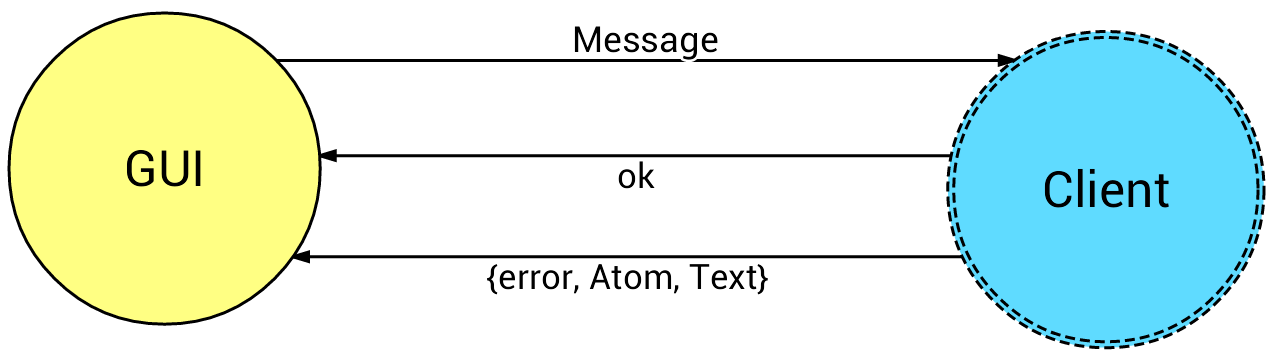
The GUI sends a message Message requesting some operations. Then, the
Client either replies with the atom ok or {error, Atom, Text}. Atom ok
indicates that the operation succeeded. Tuple {error, Atom, Text} denotes that
something went wrong while processing the request. These errors are not
fatal and the GUI can recover from them. Variable Text contains the text to
be reported in the System tab of the GUI. You are free to choose the
value of Text. However, you should strictly use the values for Atom as
described by the protocol.
Connecting to the server
When the user writes the command
/connect Server, the GUI sends the message{connect, Server}to the client process, where variableServerdenotes the name of the chat server chosen by the user.Atom
user_already_connectedis used when the user tried to connect but it is already connected to the server. Atomserver_not_reachedis returned when the server process cannot be reached for any reason.Disconnecting from the server
When the user writes the command
/disconnect, the GUI sends the messagedisconnectto the client process. It is possible to disconnect from a server only if the user has left all the chat rooms (i.e. channels) first.Atom
user_not_connectedis returned when a user tries to disconnect from a server where he/she is not connected to. Atomleave_channels_firstis returned when a user tries to disconnect from a server without leaving the chat rooms first. Lastly, atomserver_not_reachedis used when the server process cannot be reached for any reason.
Joining a chat room
To join a chat room, users write the command
/join Chatroom, whereChatroomis a string starting with "#", e.g., "#hobbits". The GUI sends the message{join, Chatroom}.Internally, if the chat room does not exists in the server side, the server process will create it. We assume that, once created, chat rooms are never destroyed, i.e., they will always exist as long as the server runs. Bear in mind that only users who have joined a chat room can write messages on it.
Atom
user_already_joinedis return when a user tries to join to the same channel again.Writing messages in a chat room
When the user is in a chat room and writes an string (not started with
/), the GUI sends the message{msg_from_GUI, Chatroom, String}where variableChatroomcontains the name of the channel as an string (e.g. "#hobbits") and variableStringstores the typed string (e.g. "hello fellow hobbits").Atom
user_not_joinedis returned when a user tries to write a message in a channel that he/she has not joined.Leaving a chat room
When the user types
/leavein a chat room, the GUI sends the message{leave, Chatroom}, where variableChatroomcontains the name of the chat room.Atom
user_not_joinedis returned when a user tries to leave a channel that he/she has not joined.Asking for the nickname
When the user writes the command
/whoami, the GUI sends the messagewhoamito the client process. The client should respond with the nick as a string (instead of the atomok). There are no errors to report in this case.Changing the nickname
When the user writes the command
/nick Name, the GUI sends the message{nick, Name}to the client process. VariableNamecontains the new chosen nickname for the user.To make things easier, you only need to support changing nick when the user is disconnected. Return atom
user_already_connectedif the user attempts to change nick when connected.Optional: If you wish to implement changing the nick when connected, you should return atom
nick_takenwhen trying to change to nick that is already taken.
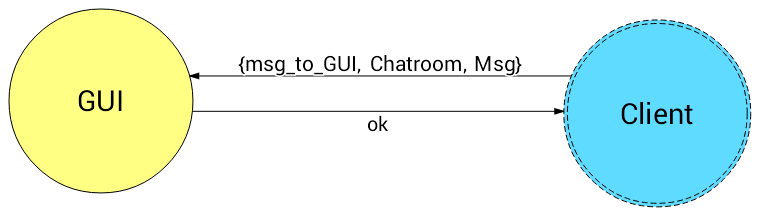
Until this point, the protocol describes communications initiated by the
GUI. There is only one occasion when the client process starts
communication with the GUI: when something is written to a channel, the client
needs to tell the GUI to display the new text.
The client process sends the message {msg_to_GUI, Chatroom, Msg} when
it wishes to print out the line Msg in the chat room Chatroom.
For that, we use the following line of code (which you do not need to change):
gen_server:call(list_to_atom(GUIName), {msg_to_GUI, Chatroom, Name++"> "++Msg})
Where Name is the nick of the author and Msg is their message.
Observe that gen_server is not the same as genserver (the module that has been shown in class).
Module gen_server is the OTP implementation of a generic server.
Variable GUIName contains the name for the GUI process,
which is generated in the gui.erl module
and passed onto your client in client:initial_state/2.
Errors

Fatal errors
The client process has the chance to respond to the GUI with the tuple
{'EXIT', Reason}. This tuple indicates to the GUI that something went very wrong on the client side, e.g. when the server process clashes in the middle of processing a request. The GUI will display the content of variableReasonand exit. You might see this behavior during development but it is clear that it should not appear in your submission when we will test it.Other errors
When developing your solution, you might find yourself wondering "what if this fails?", "what should process A or B do then?", "should I modify my code to catch this error?", etc. If you want to take this road, you will go down the rabbit hole! Try to focus on making your solution work as described by the protocol above. For instance, you might decide to only report those errors described above, and making your solution crash if some other error occurs.
Code skeleton
In this lab, you are required to build the client and server processes based on the structure in the skeleton code. The main reason for that is to make it easier to have your lab up and running. You could use any Erlang code that we saw at the lectures if it helps you.
We will give you the following files. Do not edit the ones highlighted in red.
| Component | Files | Description |
|---|---|---|
| GUI | gui.erl lexgrm.erl grm.yrl lex.xrl |
These files contain the implementation of the GUI. Do not modify them. |
| Testing | test_client.erl dummy_gui.erl |
Files used for testing. Do not modify them. |
| Record definitions | defs.hrl |
This file contain record definitions. The state of the client, server, or
any other entity that you wish to add should represent its state as a record.
We provide you with some incomplete definitions already.
For instance, -record(client_st, {gui}). defines the record
client_st (client state) where field gui stores the name of the GUI.
|
| Client process | client.erl |
The exported function client:loop/2 handles each different kind of request, returning a tuple of the response and the updated state.
You also need to implement initial_state(Nick, GUIName) which generates the initial state for the client.
|
| Server process | server.erl |
The exported function server:loop/2 handling messages from the GUI process in a loop, in a similar way to the client.
It is up to you to decide the protocol between the client and the server!
You also need to implement initial_state(ServerName) which generates the initial state for the server.
|
| CCHAT | cchat.erl |
This is the top level module. It is used to launch the server and several clients with their respective GUIs. Do not modify this file. |
| Generic Server | genserver.erl |
This file contains functions for spawning and running Erlang processes as servers. and implementing synchronous message passing. It is used internally, so do not modify this file... but you might want to use its functions yourselves! |
Obtaining the code
Easy method
To download the skeleton code as an archive, click on the button that says "Download ZIP" on the repository page. Be advised that we may make improvements to the skeleton and you may be required to update some files manually. For a better solution, use Git (below).
Using Git
First clone the repository locally, naming the upstream remote as skeleton (instead of the default origin):
git clone -o skeleton https://github.com/Chalmers-TDA382/tda382-lab3-code-skeleton.git cchat
Then enter the cchat folder and start working on your solution!
If you want to push your changes to your own private repository, set that up as the origin remote and push to it:
git remote add origingit push -u origin master
As with any other coding project, we suggest that you commit and push frequently:
git commit -am "Informative commit message"
git push origin
Whenever you need to update the skeleton, pull from the skeleton remote:
git pull skeleton master
Unless you have made modifications to the skeleton files, you shouldn't have any merge conflicts. If you have uncommited local changes, try stashing them first:
git stash
git pull skeleton master
<...>
git stash pop
Compiling for the first time
After you download it (and extract the files) you should compile everything with the command:
$ make all
You can then open the Erlang shell (erl) and start a client with cchat:start()..
You should be able to start the server and open up chat windows,
but Bilbo and Frodo will not able to communicate because most of the functions are not implemented.
It is your task to make sure that they can!
Alternatives to make
If you do not have make command, you should run the following commands in the Erlang shell:
cd("the directory where the skeleton code is").
c(lexgrm).
lexgrm:start().
cover:compile_directory().
Tips
The server process will be registered (using Erlang's
registerBIF) to an atom of the same name. So when the server name is shire, you can send messages directly to the atomshirewithout knowing the server's process ID. You might also want to check the functionlist_to_atom.From the Erlang shell, use the function
cover:compile_directory/0to re-compile all Erlang files in the current directory.
Test cases
All unit tests are contained in the file test_client.erl.
Tests are carried out using EUnit. We have created entries in the Makefile to make
life easier for you (see below for alternatives to using make).
There are positive and negative tests which check that your solution follows the requirements and protocol as specified above. To run these tests, execute the following:
$ make -s run_tests
If your submission fails any of the tests, it is a good indication that your submission will be rejected. However even if you pass all of the tests, that is not a guarantee that your submission will be accepted.
Robustness tests
Included in the unit tests are robustness tests, which test your use of concurrency.
The robust_channel test checks if your chat server can continue to operate when some of your requests are caused to hang.
It works as follows (actual values may change):
- A server is started and 4 channels are created.
- Each channel is joined by 3 users. No user is in more than one channel, making the total number of users 4 × 3 = 12.
- Every user sends 2 messages on their respective channel. The test framework will automatically make some of these requests hang.
- We count how many messages get through successfully. If you use concurrency correctly, only the blocked messages should get stuck, and all others should be delivered successfully.
The robust_server test checks how independent your channels are from your server.
It does this by killing the server process during an ongoing chat.
If this causes the entire CCHAT system to die then the test will fail, which is a sure sign that your solution is not very concurrent.
To run just the robustness tests, use:
$ make -s run_robustness_tests
Alternatives to make
If your system doesn't have the make command, you can run the test suites like so:
$ erlc *.erl
$ erl -noshell -eval "eunit:test(test_client), halt()"
Turning off colour codes
If you don't have a colour-enabled terminal, you will see a lot of ugly colour codes in your test output.
You can disable these by commenting out the colour function in test_client.erl and replacing it with:
colour(Num,S) -> S.
Submission
You should submit your code based on the skeleton code and whatever other files are needed for your solution to work. In addition, you should comment your code so that graders can easily review your submission.